RabbitMQ – Topic Exchange
8 years ago Lalit Bhagtani 2
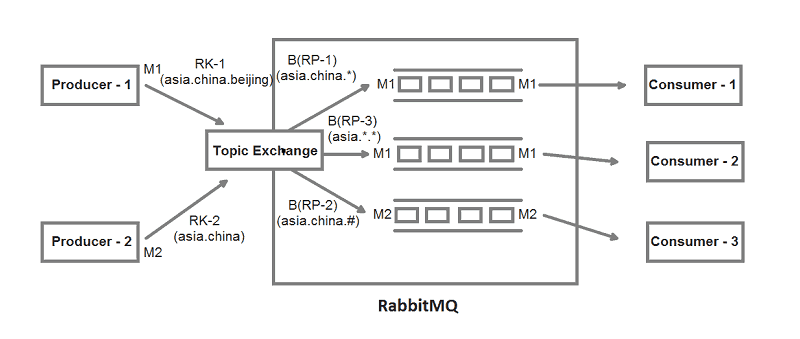
Topic Exchange :- A topic exchange is an exchange which route messages to queues based on the wildcard match between routing key and routing pattern specified during the binding of the queue. Producer adds routing key in message header and sends it to topic exchange. After receiving a message, exchange try to match the routing key with the binding routing pattern of all the queues bound to it. If match is found, it route the message to the queue whose routing pattern is matched and if match is not found, it ignored the message.
Routing key :- It is the list of words, delimited by a period (.), for example “asia.china.beijing”
Routing Pattern :- It is the pattern, which is specified during the binding of the queue, it is the list of words and wildcard characters like “*” and “#“, delimited by a period (.). The use of wildcard characters are as follows :-
- “*” :- It is used to match a word at a specific position in the routing key, for example a routing pattern of “asia.china.*” will match to the routing keys where first word is “asia” and the second word is “china” like, “asia.china.beijing” and “asia.china.nanjing”.
- “#” :- It is used to match zero or more words, for example a routing pattern of “asia.china.#” will match to the routing keys that begin with “asia.china” like, “asia.china” and “asia.china.beijing”.

Example of Topic Exchange :-
First, we create an ExchangeType enum class, which will define all the exchange types.
public enum ExchangeType {

  DIRECT("direct"),
  TOPIC("topic"),
  FANOUT("fanout"),
  HEADER("headers");

  private final String exchangeName;

  ExchangeType(String exchangeName) {
    this.exchangeName = exchangeName;
  }

  public String getExchangeName() {
    return this.exchangeName;
  }

}
Second, we create a RabbitMQConnection class, which will instantiate ConnectionFactory object and set its properties like username, password, virtualhost, host, and port. Since, I am using local RabbitMQ setup, So I will only set host property as “localhost“, other properties will be set to its default value by RabbitMQ system. This class will instantiate ConnectionFactory object and return it, to its calling method.
import com.rabbitmq.client.Connection;
import com.rabbitmq.client.ConnectionFactory;

public class RabbitMQConnection {

  public static Connection getConnection(){
    Connection conn = null;
    try{
        ConnectionFactory factory = new ConnectionFactory();
        //factory.setUsername("");
        //factory.setPassword("");
        //factory.setVirtualHost("");
        factory.setHost("localhost");
        //factory.setPort(15672);
        conn = factory.newConnection();
    }catch(Exception e){
        e.printStackTrace();
    }
    return conn;
  }

}
Third, we create a TopicExchange class, which will declare one topic exchange and three different queues and bind it using different routing patterns.
import com.rabbitmq.client.Channel;
import com.rabbitmq.client.Connection;
import com.rabbitmq.helper.ExchangeType;

public class TopicExchange {

 public static String EXCHANGE_NAME = "topic-exchange";
 public static String QUEUE_NAME_1 = "topic-queue-1";
 public static String QUEUE_NAME_2 = "topic-queue-2";
 public static String QUEUE_NAME_3 = "topic-queue-3";

 public static String ROUTING_PATTERN_1 = "asia.china.*";
 public static String ROUTING_PATTERN_2 = "asia.china.#";
 public static String ROUTING_PATTERN_3 = "asia.*.*";

 public static String ROUTING_KEY_1 = "asia.china.nanjing";
 public static String ROUTING_KEY_2 = "asia.china";
 public static String ROUTING_KEY_3 = "asia.china.beijing";

 public void createExchangeAndQueue(){
   try{
      Connection conn = RabbitMQConnection.getConnection();
        if(conn != null){
           Channel channel = conn.createChannel();
           channel.exchangeDeclare(EXCHANGE_NAME, ExchangeType.TOPIC.getExchangeName(), true);
           // First Queue
           channel.queueDeclare(QUEUE_NAME_1, true, false, false, null);
           channel.queueBind(QUEUE_NAME_1, EXCHANGE_NAME, ROUTING_PATTERN_1);

           // Second Queue
           channel.queueDeclare(QUEUE_NAME_2, true, false, false, null);
           channel.queueBind(QUEUE_NAME_2, EXCHANGE_NAME, ROUTING_PATTERN_2);

           // Third Queue
           channel.queueDeclare(QUEUE_NAME_3, true, false, false, null);
           channel.queueBind(QUEUE_NAME_3, EXCHANGE_NAME, ROUTING_PATTERN_3);

           channel.close();
           conn.close();
       }
   }catch(Exception e){
     e.printStackTrace();
   }
 }

}
Fourth, we create a Producer class, which will publish a three messages to topic exchange.
- “First Topic Message Example” with routing key as “asia.china.nanjing“.
- “Second Topic Message Example” with routing key as “asia.china“.
- “Third Topic Message Example” with routing key as “asia.china.beijing“.
import com.rabbitmq.client.Channel;
import com.rabbitmq.client.Connection;

public class Producer {

 private final static String MESSAGE_1 = "First Topic Message Example";
 private final static String MESSAGE_2 = "Second Topic Message Example";
 private final static String MESSAGE_3 = "Third Topic Message Example";

 public void publish(){
   try{
      Connection conn = RabbitMQConnection.getConnection();
      if(conn != null){
        Channel channel = conn.createChannel();

        // First message sent by using ROUTING_KEY_1
        channel.basicPublish(TopicExchange.EXCHANGE_NAME, TopicExchange.ROUTING_KEY_1, null, MESSAGE_1.getBytes());
        System.out.println(" Message Sent '" + MESSAGE_1 + "'");

        // Second message sent by using ROUTING_KEY_2
        channel.basicPublish(TopicExchange.EXCHANGE_NAME, TopicExchange.ROUTING_KEY_2, null, MESSAGE_2.getBytes());
        System.out.println(" Message Sent '" + MESSAGE_2 + "'");

        // Third message sent by using ROUTING_KEY_3
        channel.basicPublish(TopicExchange.EXCHANGE_NAME, TopicExchange.ROUTING_KEY_3, null, MESSAGE_3.getBytes());
        System.out.println(" Message Sent '" + MESSAGE_3 + "'");

        channel.close();
        conn.close();
      }
   }catch(Exception e){
     e.printStackTrace();
   }
 }

}
Fifth, we create a Receiver class, which will create three consumers.
- consumer1 will consume from “topic-queue-1” queue.
- consumer2 will consume from “topic-queue-2” queue.
- consumer3 will consume from “topic-queue-3” queue.
import java.io.IOException;

import com.rabbitmq.client.AMQP;
import com.rabbitmq.client.Channel;
import com.rabbitmq.client.Connection;
import com.rabbitmq.client.Consumer;
import com.rabbitmq.client.DefaultConsumer;
import com.rabbitmq.client.Envelope;

public class Receiver {

 public void receive(){
   try{
     Connection conn = RabbitMQConnection.getConnection();
     if(conn != null){
       Channel channel = conn.createChannel();
       // Consumer reading from queue 1
       Consumer consumer1 = new DefaultConsumer(channel) {
         @Override
         public void handleDelivery(String consumerTag, Envelope envelope, AMQP.BasicProperties properties, byte[] body) throws IOException {
           String message = new String(body, "UTF-8");
           System.out.println(" Message Received Queue 1 '" + message + "'");
         }
       };
       channel.basicConsume(TopicExchange.QUEUE_NAME_1, true, consumer1);

       // Consumer reading from queue 2
       Consumer consumer2 = new DefaultConsumer(channel) {
         @Override
         public void handleDelivery(String consumerTag, Envelope envelope, AMQP.BasicProperties properties, byte[] body) throws IOException {
           String message = new String(body, "UTF-8");
           System.out.println(" Message Received Queue 2 '" + message + "'");
         }
       };
       channel.basicConsume(TopicExchange.QUEUE_NAME_2, true, consumer2);

       // Consumer reading from queue 3
       Consumer consumer3 = new DefaultConsumer(channel) {
         @Override
         public void handleDelivery(String consumerTag, Envelope envelope, AMQP.BasicProperties properties, byte[] body) throws IOException {
           String message = new String(body, "UTF-8");
           System.out.println(" Message Received Queue 3 '" + message + "'");
         }
       };
       channel.basicConsume(TopicExchange.QUEUE_NAME_3, true, consumer3);
       channel.close();
       conn.close();
     }
   }catch(Exception e){
      e.printStackTrace();
   }
 }

}
Finally, we create a Demo class, which will instantiate Topic Exchange ( TopicExchange )class and call its createExchangeAndQueue method to declare exchange and queues, then it will instantiate Producer class to call its publish method to send the message and finally it will instantiate Receiver class to call its receive method to consume the message.
public class Demo {

 public static void main(String args[]){
   try{
     TopicExchange ex = new TopicExchange();
     ex.createExchangeAndQueue();

     // Publish
     Producer produce = new Producer();
     produce.publish();

     // Consume
     Receiver receive = new Receiver();
     receive.receive();
   }catch(Exception e){
     e.printStackTrace();
   }
 }

}
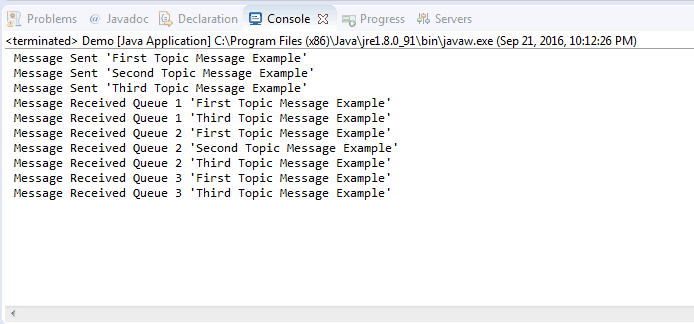
Result :-

That’s all for RabbitMQ – Topic Exchange, for more exchange types visit Headers Exchange, Direct Exchange, Fanout Exchange. If you liked it, please share your thoughts in comments section and share it with others too.

2 thoughts on “RabbitMQ – Topic Exchange”
Hi! I just started learning rabbitMQ and stumbled upon this article. But when I tried to copy this, I get different result. Can you help me?
What you are getting in result ?